

Build Custom image Ghost Windows 7 Full Software tự nhận driver và tự động Active
Trong phần này bao gồm các chuyên mục sau:
- Tích hợp trước các bản cập nhật và trình duyệt internet explorer 11 vào bộ cài gốc.
- Tạo tập tin .xml trả lời cài đặt tự động.
- Triển khai bộ cài lên máy ảo vmware player
- Cài đặt phần mềm, ứng dụng văn phòng, tùy chỉnh...
- Tạo tập tin unattend.xml trả lời tự động tùy chỉnh.
- Tạo tập tin setupcomplete.cmd
- Chạy Sysprep
- Tạo ghost
- Bộ cài Windows 7 sevice pack 1 nguyên gốc tải tại đây
- Các bản cập nhật
- Tải và cài đặt máy ảo vmware player (hoặc vmware workstation cũng được)
- Tập tin iso vmware boot tải tại đây
- 1 chiếc usb dung lượng tối thiểu 8 Gb
- Phần mềm, Office...
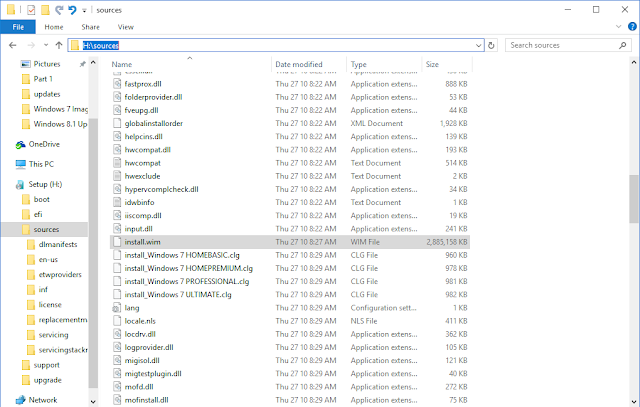
Để tích hợp trước các bản cập nhật và trình duyệt Internet explorer 11 vào bộ cài đặt gốc yêu cầu bạn phải mount tập tin gắn kết install.wim của bộ cài iso và tập tin này nằm trong thư mục sources ra một thư mục cụ thể trước khi sử dùng tùy chọn các dùng lệnh command line thêm vào bộ cài và sau đó gắn kết chúng lại.
Chuẩn bị sẵn bộ cài Windows 7 sevice pack 1
1 chiếc usb dung lượng từ 8 Gb
Phần mềm Rufus tạo bộ cài ra usb tải tại đây
Tải về bản cập nhật offline dành cho Windows 7 lưu ý bạn chỉ cần tải bản cập nhật gần đây nhất thôi là đủ rồi như bây giờ tháng 10 bạn search google từ khóa "October, 2016 Security Monthly Quality Rollup for Windows 7" và truy cập vào trang tải về của Microsoft cụ thể bây giờ là bản cập nhật msu KB3185330 tại địa chỉ https://support.microsoft.com/en-us/kb/3185330
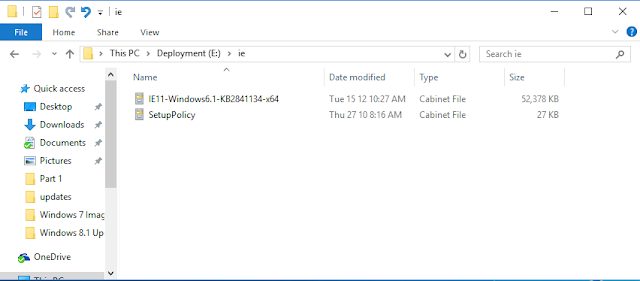
Để tích hợp được trình duyệt internet explorer 11 bạn tải gói cập nhật KB tại đây
Máy đăng cài đặt Windows 7 64 bit trở lên
Gắn usb vào máy khởi chạy phần mềm rufus tìm đến file iso Windows 7
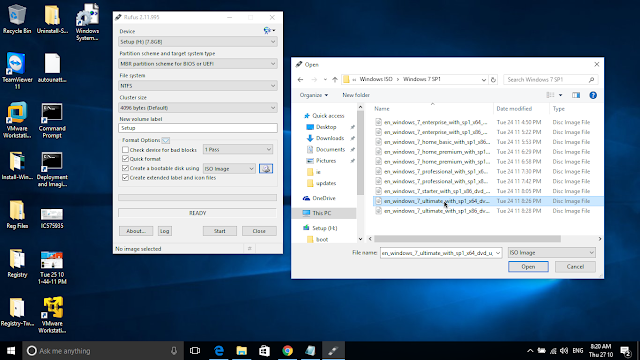
Sau khi gắn iso vào rufus để tùy chỉnh như hình dưới bấm Start bắt đầu xả bộ cài ra usb

 Trên một phân vùng ổ đĩa nào còn trống tạo 3 thư mục lần lượt là ie, mount, updates
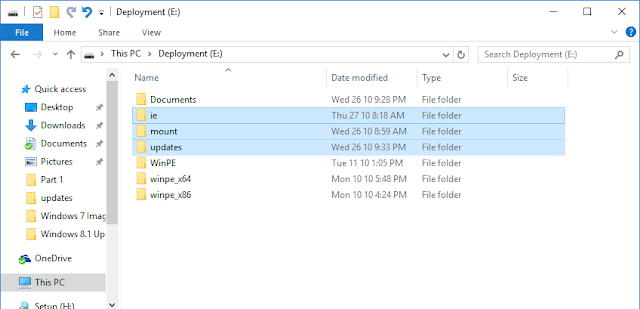

Kiểm tra thông tin của tập tin hình ảnh gắn kết install.wim sử dụng lệnh
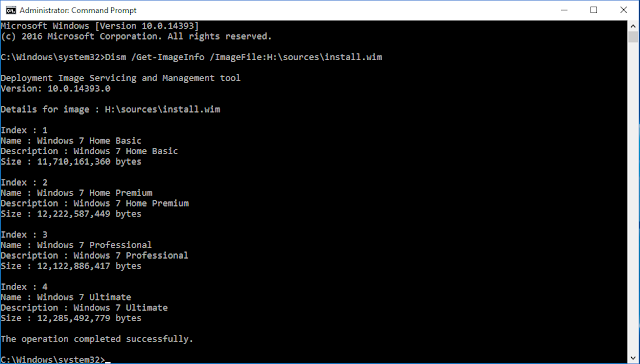
Như vậy sau khi sử dụng lệnh trên bạn thấy thông tin trong tập tin gắn kết install.wim bao gồm tất cả 4 phiên bản Windows 7 tương ứng với giá trị index của nó
Microsoft Windows [Version 10.0.14393]
(c) 2016 Microsoft Corporation. All rights reserved.
C:\Windows\system32>Dism /Get-ImageInfo /ImageFile:H:\sources\install.wim
Deployment Image Servicing and Management tool
Version: 10.0.14393.0
Details for image : H:\sources\install.wim
Index : 1
Name : Windows 7 Home Basic
Description : Windows 7 Home Basic
Size : 11,710,161,360 bytes
Index : 2
Name : Windows 7 Home Premium
Description : Windows 7 Home Premium
Size : 12,222,587,449 bytes
Index : 3
Name : Windows 7 Professional
Description : Windows 7 Professional
Size : 12,122,886,417 bytes
Index : 4
Name : Windows 7 Ultimate
Description : Windows 7 Ultimate
Size : 12,285,492,779 bytes
Bạn muốn tích hợp cập nhật vào phiên bản nào thì phải mount phiên bản đó ra tương ứng với giá trị index của nó
Mount tập tin gắn kết install.wim vào thư mục update sử dụng lệnh sau:
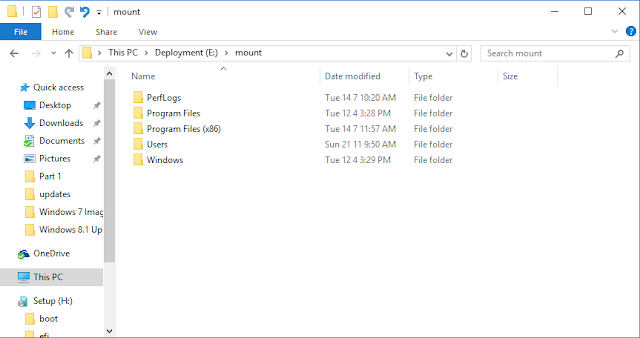
Dism /Mount-Image /ImageFile:H:\sources\install.wim /index:3 /MountDir:E:\mount
Index: 3 tương ứng với phiên bản Windows 7 Professional

Sau khi mount tập tin install.wim tương ứng với giá trị Index:3 vào thư mục mount ta được
Tích hợp các bản cập nhật trong thư mục updates vào thư mục mount sử dụng lệnh
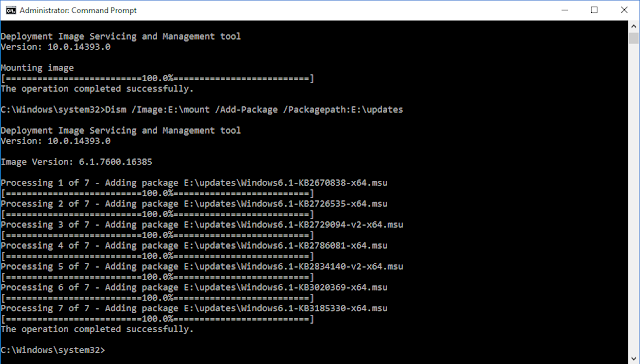
Tích hợp các file cab trong thư mục ie vào thư mục mount sử dụng lệnh
Dism /image:E:\mount /Add-Package /Packagepath:E:\ie
Lưu ý gói cab SetupPolicy sẽ báo lỗi bạn cứ kệ nó

Gắn kết các thư mục tập tin trong thư mục updates về lại tập tin gắn kết install.wim sử dụng lệnh
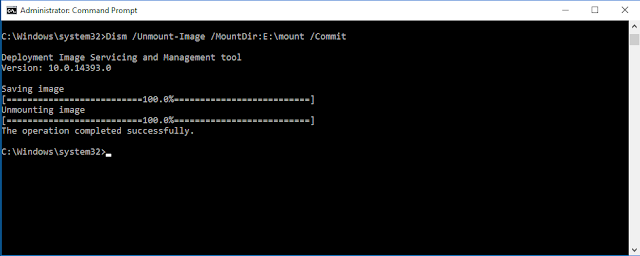
Như vậy bạn đã vừa thêm các gói cập nhật và trình duyệt ie 11 vào tập tin hình ảnh install.wim, nếu bạn muốn tích hợp vào phiên bản khác bạn lại tiếp tục mount tập tin này ra tương ứng với giá trị index của nó ví dụ bạn muốn thêm vào phiên bản Ultimate thì giá trị index của nó là 4 còn cách dòng lệnh tương tự như trên.
Phần 2: Tạo tập tin autounattend.xml trả lời cài đặt tự động
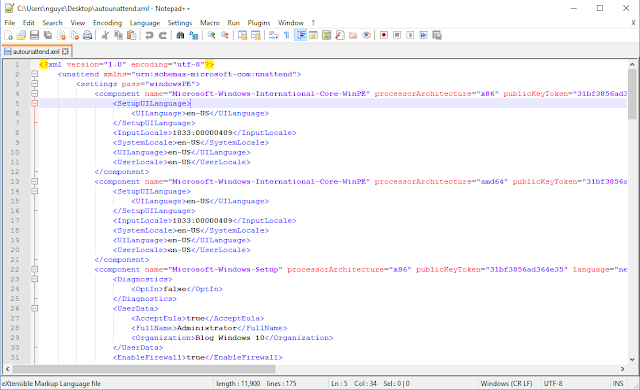
Mở Notepad ra copy tất cả các đoạn code bên dưới vào sau đó lưu lại thành autounattend.xml định dạng All files và Encoding là UTF-8
<?xml version="1.0" encoding="utf-8"?>Tập tin autounattend.xml này áp dụng cho cả 2 nền tảng 32 bit và 64 bit. Lưu ý bạn thay key màu đỏ tương ứng với phiên bản của nó, như trên là tôi đang sử dụng KMS key
<unattend xmlns="urn:schemas-microsoft-com:unattend">
<settings pass="windowsPE">
<component name="Microsoft-Windows-International-Core-WinPE" processorArchitecture="x86" publicKeyToken="31bf3856ad364e35" language="neutral" versionScope="nonSxS" xmlns:wcm="http://schemas.microsoft.com/WMIConfig/2002/State" xmlns:xsi="http://www.w3.org/2001/XMLSchema-instance">
<SetupUILanguage>
<UILanguage>en-US</UILanguage>
</SetupUILanguage>
<InputLocale>1033:00000409</InputLocale>
<SystemLocale>en-US</SystemLocale>
<UILanguage>en-US</UILanguage>
<UserLocale>en-US</UserLocale>
</component>
<component name="Microsoft-Windows-International-Core-WinPE" processorArchitecture="amd64" publicKeyToken="31bf3856ad364e35" language="neutral" versionScope="nonSxS" xmlns:wcm="http://schemas.microsoft.com/WMIConfig/2002/State" xmlns:xsi="http://www.w3.org/2001/XMLSchema-instance">
<SetupUILanguage>
<UILanguage>en-US</UILanguage>
</SetupUILanguage>
<InputLocale>1033:00000409</InputLocale>
<SystemLocale>en-US</SystemLocale>
<UILanguage>en-US</UILanguage>
<UserLocale>en-US</UserLocale>
</component>
<component name="Microsoft-Windows-Setup" processorArchitecture="x86" publicKeyToken="31bf3856ad364e35" language="neutral" versionScope="nonSxS" xmlns:wcm="http://schemas.microsoft.com/WMIConfig/2002/State" xmlns:xsi="http://www.w3.org/2001/XMLSchema-instance">
<Diagnostics>
<OptIn>false</OptIn>
</Diagnostics>
<UserData>
<AcceptEula>true</AcceptEula>
<FullName>Administrator</FullName>
<Organization>Blog Windows 10</Organization>
</UserData>
<EnableFirewall>true</EnableFirewall>
</component>
<component name="Microsoft-Windows-Setup" processorArchitecture="amd64" publicKeyToken="31bf3856ad364e35" language="neutral" versionScope="nonSxS" xmlns:wcm="http://schemas.microsoft.com/WMIConfig/2002/State" xmlns:xsi="http://www.w3.org/2001/XMLSchema-instance">
<Diagnostics>
<OptIn>false</OptIn>
</Diagnostics>
<UserData>
<AcceptEula>true</AcceptEula>
<FullName>Administrator</FullName>
<Organization>Blog Windows 10</Organization>
</UserData>
<EnableFirewall>true</EnableFirewall>
</component>
</settings>
<settings pass="generalize">
<component name="Microsoft-Windows-Security-SPP" processorArchitecture="x86" publicKeyToken="31bf3856ad364e35" language="neutral" versionScope="nonSxS" xmlns:wcm="http://schemas.microsoft.com/WMIConfig/2002/State" xmlns:xsi="http://www.w3.org/2001/XMLSchema-instance">
<SkipRearm>1</SkipRearm>
</component>
</settings>
<settings pass="generalize">
<component name="Microsoft-Windows-Security-SPP" processorArchitecture="amd64" publicKeyToken="31bf3856ad364e35" language="neutral" versionScope="nonSxS" xmlns:wcm="http://schemas.microsoft.com/WMIConfig/2002/State" xmlns:xsi="http://www.w3.org/2001/XMLSchema-instance">
<SkipRearm>1</SkipRearm>
</component>
</settings>
<settings pass="specialize">
<component name="Microsoft-Windows-Security-SPP-UX" processorArchitecture="x86" publicKeyToken="31bf3856ad364e35" language="neutral" versionScope="nonSxS" xmlns:wcm="http://schemas.microsoft.com/WMIConfig/2002/State" xmlns:xsi="http://www.w3.org/2001/XMLSchema-instance">
<SkipAutoActivation>true</SkipAutoActivation>
</component>
<component name="Microsoft-Windows-Security-SPP-UX" processorArchitecture="amd64" publicKeyToken="31bf3856ad364e35" language="neutral" versionScope="nonSxS" xmlns:wcm="http://schemas.microsoft.com/WMIConfig/2002/State" xmlns:xsi="http://www.w3.org/2001/XMLSchema-instance">
<SkipAutoActivation>true</SkipAutoActivation>
</component>
<component name="Microsoft-Windows-Shell-Setup" processorArchitecture="x86" publicKeyToken="31bf3856ad364e35" language="neutral" versionScope="nonSxS" xmlns:wcm="http://schemas.microsoft.com/WMIConfig/2002/State" xmlns:xsi="http://www.w3.org/2001/XMLSchema-instance">
<ComputerName>PC</ComputerName>
<ProductKey>FJ82H-XT6CR-J8D7P-XQJJ2-GPDD4</ProductKey>
<TimeZone>SE Asia Standard Time</TimeZone>
</component>
<component name="Microsoft-Windows-Shell-Setup" processorArchitecture="amd64" publicKeyToken="31bf3856ad364e35" language="neutral" versionScope="nonSxS" xmlns:wcm="http://schemas.microsoft.com/WMIConfig/2002/State" xmlns:xsi="http://www.w3.org/2001/XMLSchema-instance">
<ComputerName>PC</ComputerName>
<ProductKey>FJ82H-XT6CR-J8D7P-XQJJ2-GPDD4</ProductKey>
<TimeZone>SE Asia Standard Time</TimeZone>
</component>
</settings>
<settings pass="oobeSystem">
<component name="Microsoft-Windows-International-Core" processorArchitecture="x86" publicKeyToken="31bf3856ad364e35" language="neutral" versionScope="nonSxS" xmlns:wcm="http://schemas.microsoft.com/WMIConfig/2002/State" xmlns:xsi="http://www.w3.org/2001/XMLSchema-instance">
<InputLocale>1033:00000409</InputLocale>
<UILanguage>en-US</UILanguage>
<UserLocale>en-US</UserLocale>
</component>
<component name="Microsoft-Windows-International-Core" processorArchitecture="amd64" publicKeyToken="31bf3856ad364e35" language="neutral" versionScope="nonSxS" xmlns:wcm="http://schemas.microsoft.com/WMIConfig/2002/State" xmlns:xsi="http://www.w3.org/2001/XMLSchema-instance">
<InputLocale>1033:00000409</InputLocale>
<UILanguage>en-US</UILanguage>
<UserLocale>en-US</UserLocale>
</component>
<component name="Microsoft-Windows-Shell-Setup" processorArchitecture="x86" publicKeyToken="31bf3856ad364e35" language="neutral" versionScope="nonSxS" xmlns:wcm="http://schemas.microsoft.com/WMIConfig/2002/State" xmlns:xsi="http://www.w3.org/2001/XMLSchema-instance">
<RegisteredOwner>Administrator</RegisteredOwner>
<OOBE>
<HideEULAPage>true</HideEULAPage>
<NetworkLocation>Work</NetworkLocation>
<ProtectYourPC>1</ProtectYourPC>
<HideWirelessSetupInOOBE>true</HideWirelessSetupInOOBE>
<SkipMachineOOBE>true</SkipMachineOOBE>
<SkipUserOOBE>true</SkipUserOOBE>
</OOBE>
<DisableAutoDaylightTimeSet>true</DisableAutoDaylightTimeSet>
<FirstLogonCommands>
<SynchronousCommand wcm:action="add">
<RequiresUserInput>false</RequiresUserInput>
<Description>Disable Auto Updates</Description>
<CommandLine>reg add "HKEY_LOCAL_MACHINE\SOFTWARE\Microsoft\Windows\CurrentVersion\WindowsUpdate\Auto Update" /v AUOptions /t REG_DWORD /d 1 /f</CommandLine>
</SynchronousCommand>
</FirstLogonCommands>
<AutoLogon>
<Password>
<Value></Value>
<PlainText>true</PlainText>
</Password>
<Enabled>true</Enabled>
<Username>Administrator</Username>
</AutoLogon>
<UserAccounts>
<LocalAccounts>
<LocalAccount wcm:action="add">
<Password>
<Value></Value>
<PlainText>true</PlainText>
</Password>
<DisplayName>Administrator</DisplayName>
<Group>Administrators</Group>
<Name>Administrator</Name>
</LocalAccount>
</LocalAccounts>
</UserAccounts>
</component>
<component name="Microsoft-Windows-Shell-Setup" processorArchitecture="amd64" publicKeyToken="31bf3856ad364e35" language="neutral" versionScope="nonSxS" xmlns:wcm="http://schemas.microsoft.com/WMIConfig/2002/State" xmlns:xsi="http://www.w3.org/2001/XMLSchema-instance">
<RegisteredOwner>Administrator</RegisteredOwner>
<OOBE>
<HideEULAPage>true</HideEULAPage>
<NetworkLocation>Work</NetworkLocation>
<ProtectYourPC>1</ProtectYourPC>
<HideWirelessSetupInOOBE>true</HideWirelessSetupInOOBE>
<SkipMachineOOBE>true</SkipMachineOOBE>
<SkipUserOOBE>true</SkipUserOOBE>
</OOBE>
<DisableAutoDaylightTimeSet>true</DisableAutoDaylightTimeSet>
<FirstLogonCommands>
<SynchronousCommand wcm:action="add">
<RequiresUserInput>false</RequiresUserInput>
<Description>Disable Auto Updates</Description>
<CommandLine>reg add "HKEY_LOCAL_MACHINE\SOFTWARE\Microsoft\Windows\CurrentVersion\WindowsUpdate\Auto Update" /v AUOptions /t REG_DWORD /d 1 /f</CommandLine>
</SynchronousCommand>
</FirstLogonCommands>
<AutoLogon>
<Password>
<Value></Value>
<PlainText>true</PlainText>
</Password>
<Enabled>true</Enabled>
<Username>Administrator</Username>
</AutoLogon>
<UserAccounts>
<LocalAccounts>
<LocalAccount wcm:action="add">
<Password>
<Value></Value>
<PlainText>true</PlainText>
</Password>
<DisplayName>Administrator</DisplayName>
<Group>Administrators</Group>
<Name>Administrator</Name>
</LocalAccount>
</LocalAccounts>
</UserAccounts>
</component>
</settings>
<settings pass="offlineServicing">
<component name="Microsoft-Windows-LUA-Settings" processorArchitecture="x86" publicKeyToken="31bf3856ad364e35" language="neutral" versionScope="nonSxS" xmlns:wcm="http://schemas.microsoft.com/WMIConfig/2002/State" xmlns:xsi="http://www.w3.org/2001/XMLSchema-instance">
<EnableLUA>false</EnableLUA>
</component>
</settings>
<settings pass="offlineServicing">
<component name="Microsoft-Windows-LUA-Settings" processorArchitecture="amd64" publicKeyToken="31bf3856ad364e35" language="neutral" versionScope="nonSxS" xmlns:wcm="http://schemas.microsoft.com/WMIConfig/2002/State" xmlns:xsi="http://www.w3.org/2001/XMLSchema-instance">
<EnableLUA>false</EnableLUA>
</component>
</settings>
</unattend>
KMS Client Setup Key

Windows 7 Professional: FJ82H-XT6CR-J8D7P-XQJJ2-GPDD4
Windows 7 Professional N: MRPKT-YTG23-K7D7T-X2JMM-QY7MG
Windows 7 Professional E: W82YF-2Q76Y-63HXB-FGJG9-GF7QX
Windows 7 Enterprise: 33PXH-7Y6KF-2VJC9-XBBR8-HVTHH
Windows 7 Enterprise N: YDRBP-3D83W-TY26F-D46B2-XCKRJ
Windows 7 Enterprise E: C29WB-22CC8-VJ326-GHFJW-H9DH4
Hoặc bạn cũng có thể dùng key kích hoạt tương ứng với phiên bản Windows mà bạn muốn cài đặt cũng được.
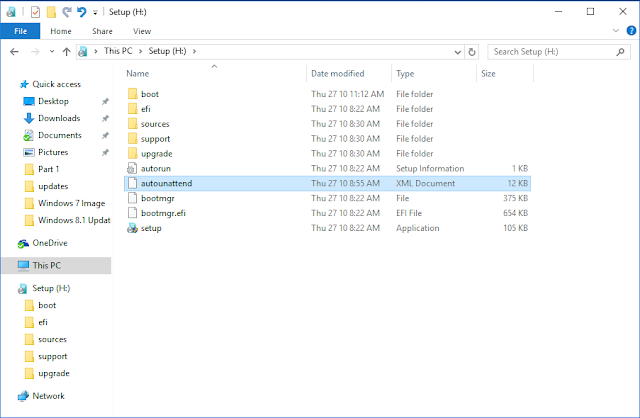
Sau khi lưu lại tập tin autounattend.xml bạn copy nó vào usb
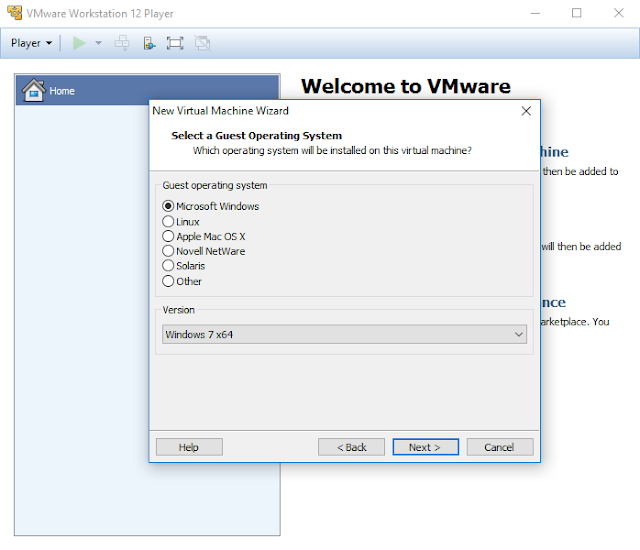
Phần 3: Triển khai cài đặt Windows 7 trên máy ảo vmware player
Trong phần này bạn tải và cài đặt máy ảo vmware player, cấu hình máy ảo và triển khai bộ cài
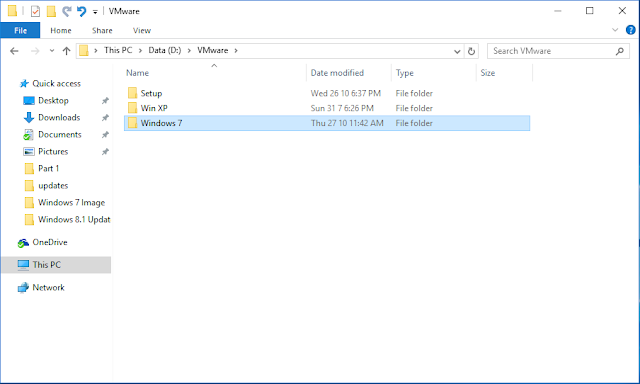
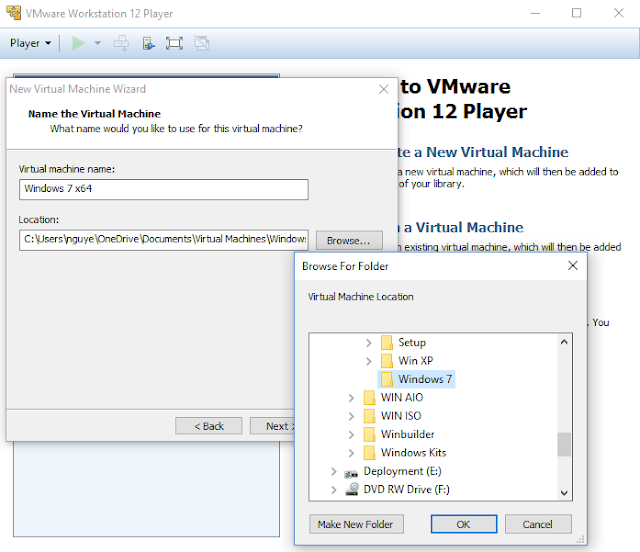
Tạo một thư mục ở ổ đĩa nào còn trống lấy tên Windows 7 chẳng hạn mục đích khi bạn cài đặt Windows 7 lên máy ảo thì tất cả các thư mục và tập tin của máy ảo sẽ nằm trong thư mục này.
Trong phần Specify disk capacty bạn có thể tùy chỉnh dung lượng ổ ảo hoặc cứ để nguyên mặc định nhấn Next cũng được và bấm Finish trong hộp thoại kế tiếp
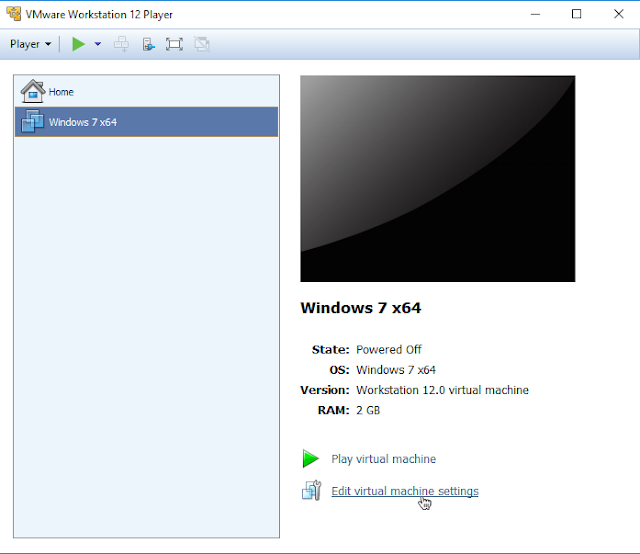
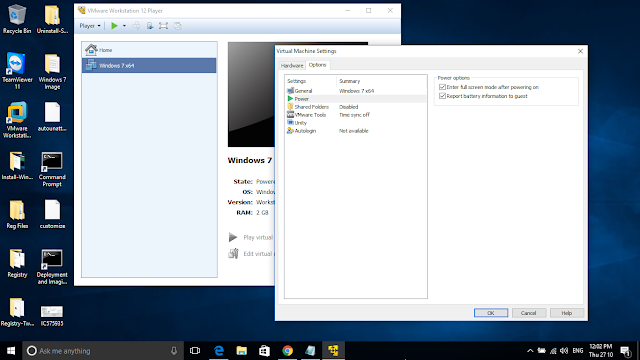
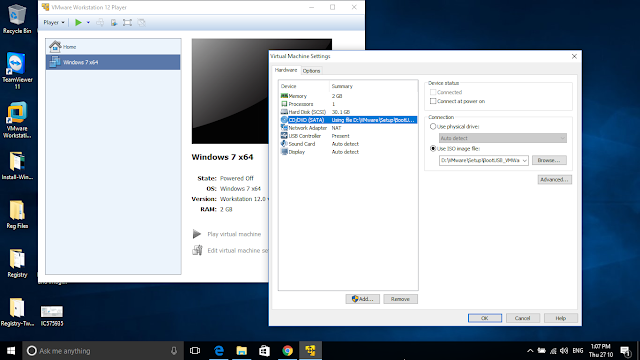
Tiếp tục trong máy ảo Windows 7 vừa tạo nhấn edit virtual maniche settings. Ở tab Hardware trong phần CD/DVD (Sata) bên phải tích vào ô Use ISO image file bấm Browse điều hướng đến tập tin vmware boot mà bạn đã tải về ở khâu chuẩn bị.
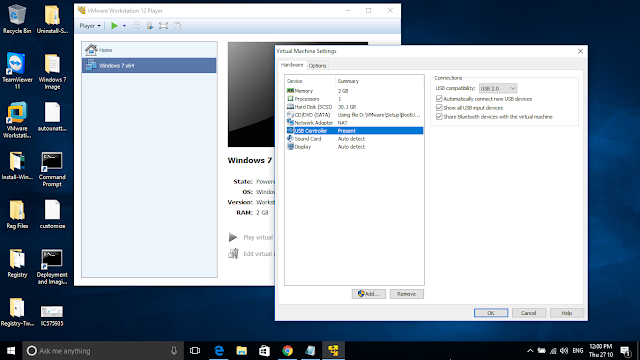
Chuyển qua tab Options phần Power bạn tích vào các ô bên phải và bấm OK hoàn tất
Khi cấu hình xong bấm Play virtual machine bắt đầu cài đặt Windows 7 trên máy ảo trong tab Player bấm chuột tìm đến Remove devices chọn usb cài đặt Windows 7 và bấm Connect
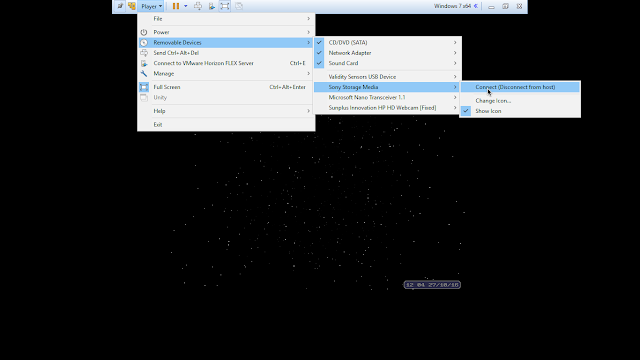
Sau khi kết nối usb với máy ảo quay trở lại bạn bấm mũi tên xuống chọn usb và nhấn enter
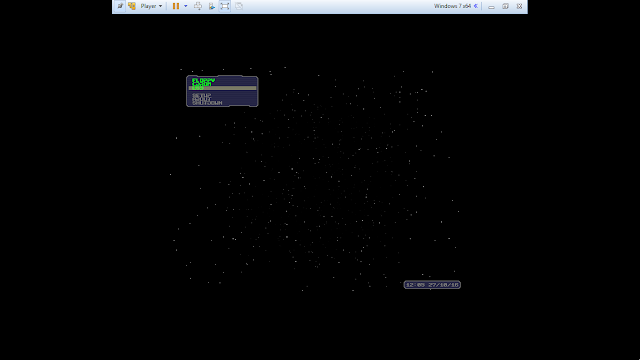
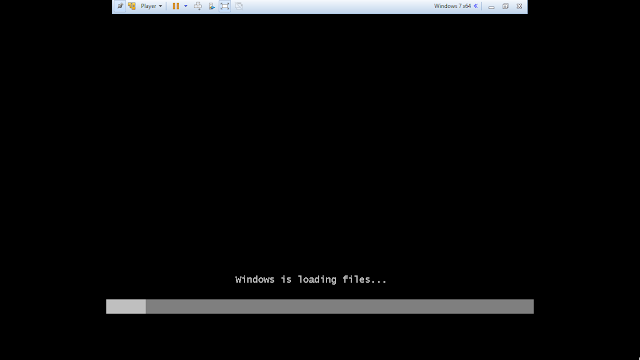
Nếu kết nối thành công Windows sẽ load file cài đặt
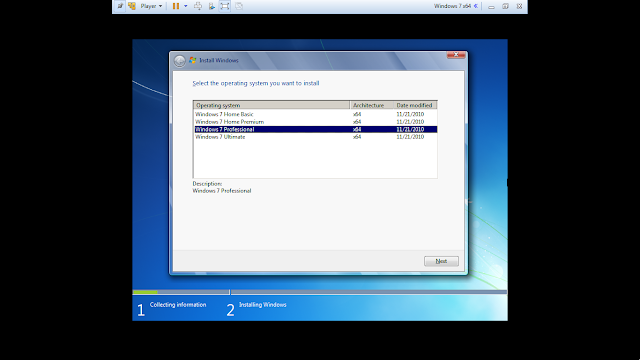
Chọn phiên bản mà bạn đã thêm cập nhật và trình duyệt ie 11
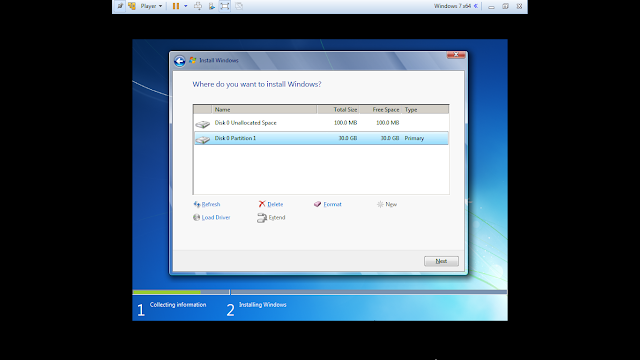
Trong phần Where you want install Windows tích chọn Drive Options, tiếp tục bấm New bấm Apply và bấm Ok xác nhận. Lại chọn Partititon 1: System Reserved bấm Delete nó đi bấm Ok xác nhận. Cuối cùng bấm chọn Partition 2 và bấm Next bắt đầu cài đặt
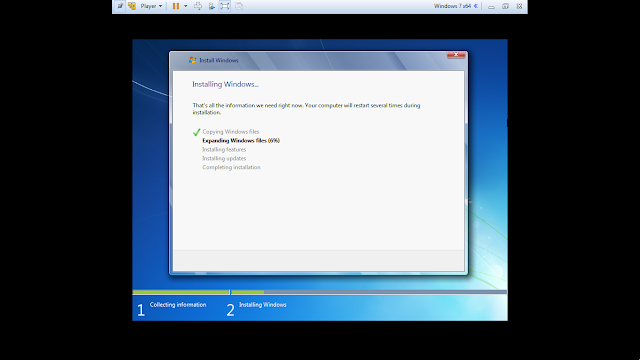
Khi tới màn hình bên dưới bạn không phải thao tác thêm gì cả vì đã có file trả lời cài đặt tự đông hết rồi chỉ chờ nó boot vào màn hình desktop thôi.
Và sau khi đã cài đặt xong boot vào desktop

Lúc này bạn nên tắt máy ảo đi. Mẹo bạn nên copy cả thư mục Windows 7 sang một nơi khác phòng khi đang làm gặp lỗi hay muốn làm bản khác thì đỡ phải cài lại từ đầu.
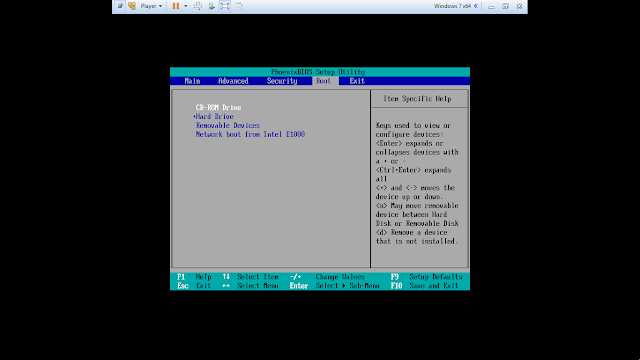
Bấm Play virtual machine khởi chạy Windows 7 trên máy ảo giữ phím F2 để vào bios của máy ảo chuyển qua tab boot bấm phím (+) (-) trên bàn phím chuyển boot từ CD-Rom Drive lên đầu sau đó bấm F10 lưu lại tùy chỉnh.
Phần 4: Cài đặt phần mềm, ứng dụng văn phòng, tùy chỉnh...
Gắn usb vào máy ảo để cài đặt phần mềm
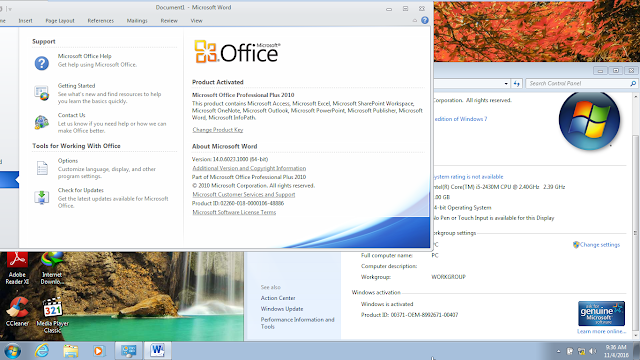
Khi cài đặt phần mềm hay ứng dụng văn phòng bạn nên dẫn lối tắt của ứng dụng hay phần mềm ra ngoài desktop. Nếu cài đặt office 2010 có thể dùng phần mềm Office 2010 Toolkit kích hoạt, tải tại đây, hoặc cài office 2013 hoặc 2016 dùng phần mềm KMSAuto Net 2015 v1.4.2 Portable kích hoạt, tải tại đây
Phần tinh chỉnh hệ thống tùy vào kiến thức hiểu biết của mỗi người mà tùy chỉnh theo ý mình nhưng nên nhớ nếu có tắt dịch vụ service không được tắt những dịch vụ liên quan đến mạng. Với trình duyệt mặc định bạn có thể ghim vào thanh dấu trang những tab yêu thích tùy chỉnh trang chủ
Ngoài ra bạn còn có thể cài đặt thêm các gói giao diện theme cho Windows, mod icon hệ thống, thay đổi thông tin cá nhân,... tuy nhiên bạn không thể ghim phần mềm hay ứng dụng vào taskbar vì nếu ghim cài đặt lại cũng mất.

Chạy Command Prompt sử dụng lệnh sau để tắt
powercfg -h off
Phần 5: Tạo tập tin unattend.xml trả lời tự động tùy chỉnh.
Công cụ sysprep tool có tác dụng làm sạch các file temp, xóa bỏ driver máy, tắt tài khoản Administrator, xóa thư mục tài khoản Administrator trong đường dẫn C:\Users, xóa tất cả các tùy chỉnh của người dùng trước trước khi đưa máy về tình trạng ban đầu trong khi vẫn giữ nguyên các phần mềm ứng dụng đã cài đặt, những tùy chỉnh hệ thống trong dịch vụ, registry.
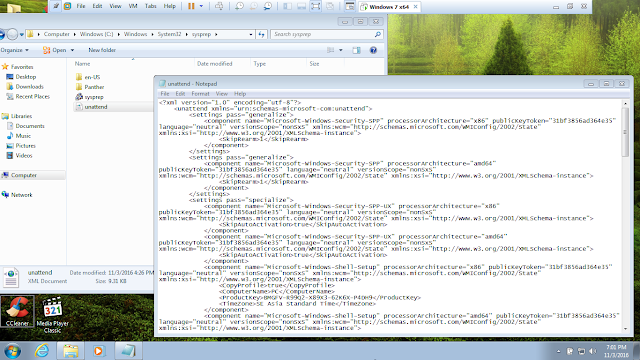
Tạo một tập tin xml tùy chỉnh, mở ứng dụng notepad ra copy tất cả các đoạn code bên dưới vào sau đó lưu lại thành unattend.xml định dạng All files và Encoding là UTF-8
<?xml version="1.0" encoding="utf-8"?>Thay thế các giá trị amd64 trong ngoặc kép thành x86 nếu sử dụng cho windows 7 32 bit và key tương ứng với phiên bản của bộ cài. Quan trọng các giá trị màu xanh để copy tùy chỉnh của người dùng trước khi chạy sysprep sang người dùng mới sau khi cài đặt lại, nếu không có giá trị này toàn bộ phần shorcut ngoài desktop, cá nhân hóa, tùy chỉnh trên trình duyệt sẽ mất.
<unattend xmlns="urn:schemas-microsoft-com:unattend">
<settings pass="generalize">
<component name="Microsoft-Windows-Security-SPP" processorArchitecture="amd64" publicKeyToken="31bf3856ad364e35" language="neutral" versionScope="nonSxS" xmlns:wcm="http://schemas.microsoft.com/WMIConfig/2002/State" xmlns:xsi="http://www.w3.org/2001/XMLSchema-instance">
<SkipRearm>1</SkipRearm>
</component>
</settings>
<settings pass="specialize">
<component name="Microsoft-Windows-Security-SPP-UX" processorArchitecture="amd64" publicKeyToken="31bf3856ad364e35" language="neutral" versionScope="nonSxS" xmlns:wcm="http://schemas.microsoft.com/WMIConfig/2002/State" xmlns:xsi="http://www.w3.org/2001/XMLSchema-instance">
<SkipAutoActivation>true</SkipAutoActivation>
</component>
<component name="Microsoft-Windows-Shell-Setup" processorArchitecture="amd64" publicKeyToken="31bf3856ad364e35" language="neutral" versionScope="nonSxS" xmlns:wcm="http://schemas.microsoft.com/WMIConfig/2002/State" xmlns:xsi="http://www.w3.org/2001/XMLSchema-instance">
<CopyProfile>true</CopyProfile>
<ComputerName>PC</ComputerName>
<ProductKey>FJ82H-XT6CR-J8D7P-XQJJ2-GPDD4</ProductKey>
<TimeZone>SE Asia Standard Time</TimeZone>
</component>
</settings>
<settings pass="oobeSystem">
<component name="Microsoft-Windows-International-Core" processorArchitecture="amd64" publicKeyToken="31bf3856ad364e35" language="neutral" versionScope="nonSxS" xmlns:wcm="http://schemas.microsoft.com/WMIConfig/2002/State" xmlns:xsi="http://www.w3.org/2001/XMLSchema-instance">
<InputLocale>1033:00000409</InputLocale>
<UILanguage>en-US</UILanguage>
<UserLocale>en-US</UserLocale>
</component>
<component name="Microsoft-Windows-Shell-Setup" processorArchitecture="amd64" publicKeyToken="31bf3856ad364e35" language="neutral" versionScope="nonSxS" xmlns:wcm="http://schemas.microsoft.com/WMIConfig/2002/State" xmlns:xsi="http://www.w3.org/2001/XMLSchema-instance">
<RegisteredOwner>Administrator</RegisteredOwner>
<OOBE>
<HideEULAPage>true</HideEULAPage>
<NetworkLocation>Work</NetworkLocation>
<ProtectYourPC>1</ProtectYourPC>
<HideWirelessSetupInOOBE>true</HideWirelessSetupInOOBE>
<SkipMachineOOBE>true</SkipMachineOOBE>
<SkipUserOOBE>true</SkipUserOOBE>
</OOBE>
<DisableAutoDaylightTimeSet>true</DisableAutoDaylightTimeSet>
<FirstLogonCommands>
<SynchronousCommand wcm:action="add">
<RequiresUserInput>false</RequiresUserInput>
<Description>Disable Auto Updates</Description>
<CommandLine>reg add "HKEY_LOCAL_MACHINE\SOFTWARE\Microsoft\Windows\CurrentVersion\WindowsUpdate\Auto Update" /v AUOptions /t REG_DWORD /d 1 /f</CommandLine>
</SynchronousCommand>
</FirstLogonCommands>
 <AutoLogon>
                    <Password>
                        <Value></Value>
                        <PlainText>true</PlainText>
                    </Password>
                    <Enabled>true</Enabled>
                    <Username>Administrator</Username>
                </AutoLogon>
                <UserAccounts>
                    <LocalAccounts>
                        <LocalAccount wcm:action="add">
                            <Password>
                                <Value></Value>
                                <PlainText>true</PlainText>
                            </Password>
                            <DisplayName>Administrator</DisplayName>
                            <Group>Administrators</Group>
                            <Name>Administrator</Name>
                        </LocalAccount>
                    </LocalAccounts>
                </UserAccounts>
<FolderLocations>
<ProfilesDirectory>C:\Users</ProfilesDirectory>
</FolderLocations>
</component>
</settings>
<settings pass="offlineServicing">
<component name="Microsoft-Windows-LUA-Settings" processorArchitecture="amd64" publicKeyToken="31bf3856ad364e35" language="neutral" versionScope="nonSxS" xmlns:wcm="http://schemas.microsoft.com/WMIConfig/2002/State" xmlns:xsi="http://www.w3.org/2001/XMLSchema-instance">
<EnableLUA>false</EnableLUA>
</component>
</settings>
</unattend>

Nếu bạn muốn thay tài khoản Administrator bằng tài khoản khác sau khi cài đặt bạn sửa các giá trị màu đỏ dưới đây thành tên tài khoản bạn muốn thay
<AutoLogon>Khi đã tùy chỉnh xong bạn copy tập tin unattend.xml này vào thư mục Sysprep theo đường dẫn C:\Windows\System32\Sysprep
<Password>
<Value></Value>
<PlainText>true</PlainText>
</Password>
<Enabled>true</Enabled>
<Username>Administrator</Username>
</AutoLogon>
<UserAccounts>
<LocalAccounts>
<LocalAccount wcm:action="add">
<Password>
<Value></Value>
<PlainText>true</PlainText>
</Password>
<DisplayName>Administrator</DisplayName>
<Group>Administrators</Group>
<Name>Administrator</Name>
</LocalAccount>
</LocalAccounts>
</UserAccounts>
Phần 6: Tạo tập tin Setupcomplete.cmd
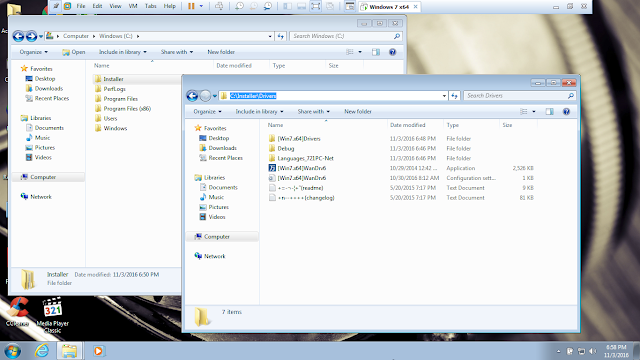
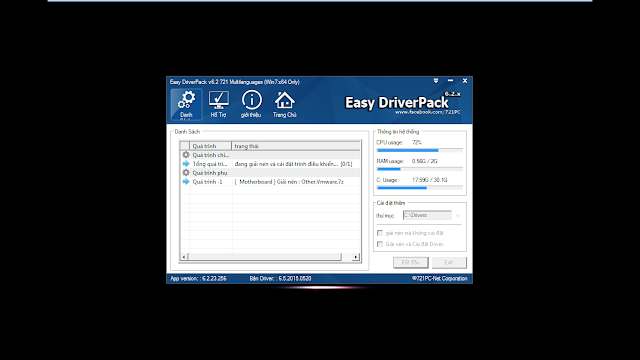
Tập tin Setupcomplete.cmd hay Setupcomplete.bat có tác dụng chạy phần mềm, mở tài liệu, xóa file hay thư mục ở lần cài đặt đầu tiên trước khi boot vào đến desktop. Tập tin này được đặt trong thư mục SCRIPTS hoặc viết thường scripts theo đường dẫn C:\Windows\Setup. Mục đích của việc tạo tập tin này là để chạy phần mềm WanDriver 6 cài đặt driver cho máy. Nếu bạn chưa có thì tải về theo liên kết bên dưới
 Mẹo: Bạn mở file [Win7.x86]WanDrv6.ini bằng notepad lên xóa 2 dòng
SysExt=%DrvPkgDir%\Extra\SysExt
SoftExt=%DrvPkgDir%\Extra\SoftExt
Tiếp tục vào thư mục [Win7.x86]Drivers hoặc [Win7.x64]Drivers lại vào thư mục Extra xóa 2 thư mục SoftExt và SysExt đi như vậy khi cài không bị dính quảng cáo trình duyệt.
Bạn phải làm chính xác phần này không là không chạy được phần mềm [Win7.x64]WanDrv6.exe trong thư mục Drivers mà bạn vừa tạo mới.
Lưu ý Với một số máy laptop sẽ không nhận đủ driver bạn phải vào trang chủ nhà sản xuất tải về cài đặt. Đa số nhận driver mạng và vga.
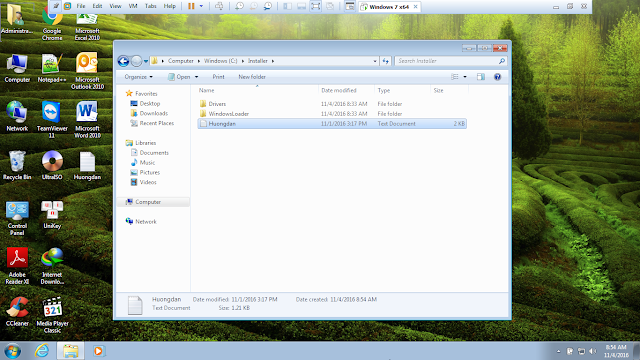
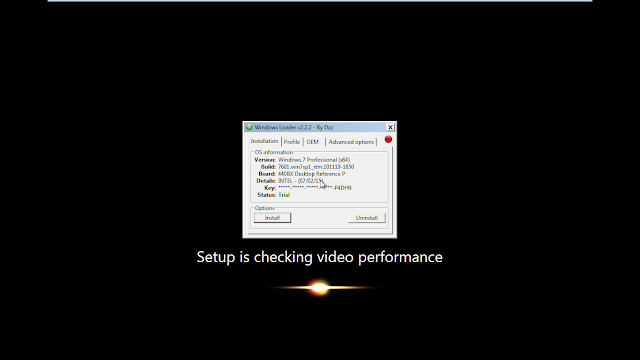
Trường hợp bạn muốn kết hợp kích hoạt luôn Windows 7 bạn có thể sử dụng phần mềm Windows Loader tải tại đây. Gải nén copy thư mục WindowsLoader vào thư mục Installer cùng với thư mục Driver.
Hướng dẫn tạo tập tin Setupcomplete.cmd
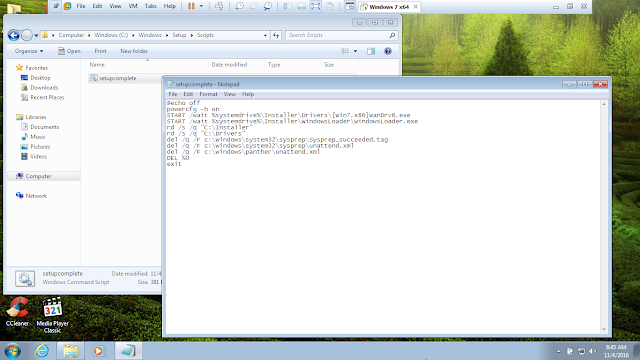
Mở trình soạn thảo Notepad lên copy đoạn code bên dưới vào lưu lại với tên Setupcomplete.cmd hoặc Seupcomplete.bat định dạng All Files
@echo off

powercfg -h on

start /wait %systemdrive%\Installer\Drivers\[Win7.x64]WanDrv6.exe

start /wait %systemdrive%\Installer\WindowsLoader\WindowsLoader.exe

rd /s /q "C:\Installer"

rd /s /q "C:\Drivers"

del /Q /F c:\windows\system32\sysprep\Sysprep_succeeded.tag

del /Q /F C:\windows\system32\sysprep\unattend.xml

del /Q /F C:\windows\panther\unattend.xml

del %0

exit
Trong đó:
- powercfg -h on: bật lại hibernate
- start /wait %systemdrive%\Installer\Drivers\[Win7.x64]WanDrv6.exe: Chạy phần mềm WanDriver6 nếu bản 32 bit là [Win7.x86]WanDrv6.exe. Tham số /wait có nghĩa khi chạy và kết thúc phần mềm này mới đến phần mềm khác.
- start /wait %systemdrive%\Installer\WindowsLoader\WindowsLoader.exe: chạy phần mềm kích hoạt Windows Loader
- rd /s /q "C:\Installer": xóa thư mục Installer sau khi đã cài driver và kích hoạt
- d /s /q "C:\Drivers": xóa thư mục Drivers tại ổ (C:) do lúc cài WanDriver6 sinh ra
- del /Q /F c:\windows\system32\sysprep\Sysprep_succeeded.tag: xóa tập tin Sysprep_succeeded.tag trong thư mục Sysprep, file này tự sinh ra sau khi chạy sysprep.exe
- del /Q /F C:\windows\system32\sysprep\unattend.xml: xóa tập tin unattend.xml đang lưu trong thư mục Sysprep
- del /Q /F C:\windows\panther\unattend.xml: xóa tập tin unattend.xml trong thư mục Panther, cái này khi bạn chạy sysprep nó sẽ sao lưu tập tin unattend.xml sang thư mục này.
- del %0: xóa chính nó tức là xóa luôn tập tin Setupcomplete.cmd
Mẹo: Nếu bạn muốn tăng thêm tính chuyên nghiệp và khẳng định tác giả bạn có thể tạo một văn bản giới thiệu hay hướng dẫn, bạn mở trình soạn thảo notepad ra viết một nội dung như giới thiệu bản thân, liên hệ..., hướng dẫn người dùng cần làm những gì sau khi họ cài đặt xong, lưu ý viết thêm một đoạn nữa là bạn vui lòng tắt đi để chương trình tiếp tục cài đặt, sau đó lưu lại với tên gì tùy bạn ví dụ như Huongdan chẳng hạn. Bạn có thể đặt tập tin này trong thư mục Installer
Bạn thêm vào tập tin Setupcomplete.cmd lệnh sau để mở văn bản này ngay sau đoạn powercfg -h on
"C:\Installer\Huongdan.txt"
Viết đầy đủ
@echo off

powercfg -h on

"C:\Installer\Huongdan.txt"

start /wait %systemdrive%\Installer\Drivers\[Win7.x64]WanDrv6.exe

start /wait %systemdrive%\Installer\WindowsLoader\WindowsLoader.exe

rd /s /q "C:\Installer"

rd /s /q "C:\Drivers"

del /Q /F c:\windows\system32\sysprep\Sysprep_succeeded.tag

del /Q /F C:\windows\system32\sysprep\unattend.xml

del /Q /F C:\windows\panther\unattend.xml

del %0

exit
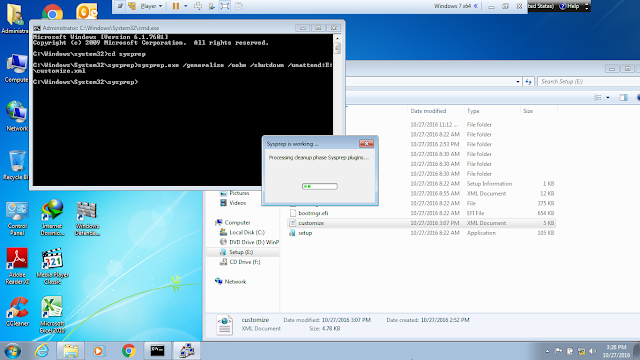
Phần 7: Chạy công cụ sysprep
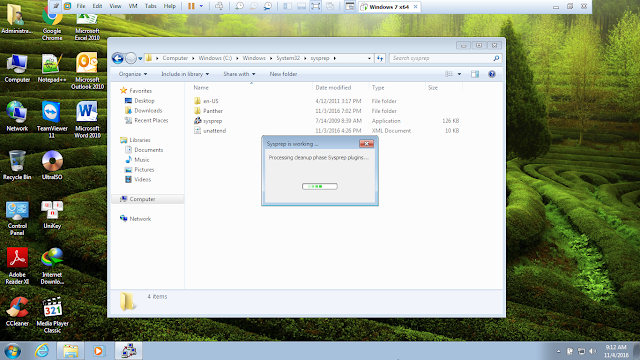
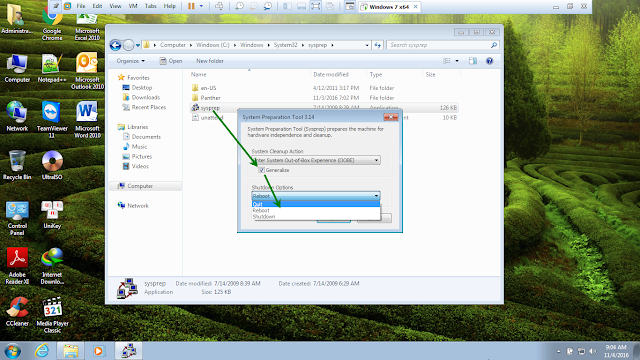
Bấm Ok để chạy sysprep tool khi chạy xong thì gắn iso Win PE vào máy ảo hoặc có usb boot thì gắn file iso vmware boot vào máy ảo đồng thời cắm usb boot vào máy và kết nối với máy ảo khi khởi động chọn usb tương tự như lúc đầu bạn cài win vậy.
Khi chạy xong sysprep khởi động lại máy ảo boot vào win pe tiến hành tạo ghost
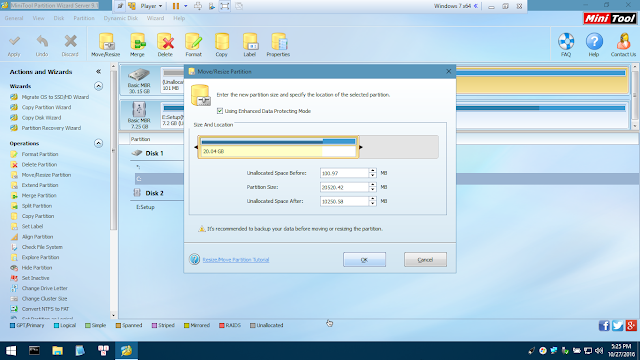
Trước tiên bạn phải cắt ra một phân vùng trống từ phân vùng (C:) cài Windows tạo phân vùng mới và lấy phân vùng này lưu file ghost.
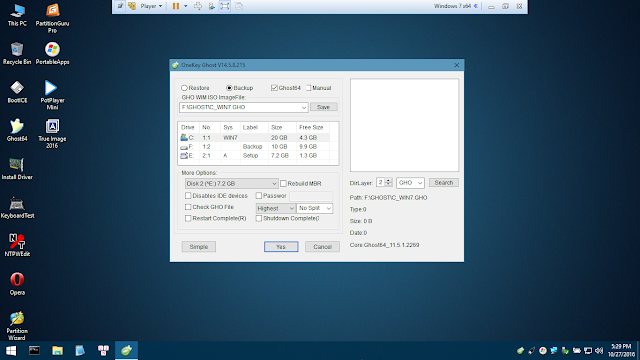
Sử dụng phần mềm onekey ghost cho đơn giản nhớ để độ nén cao nhất hoặc sử dụng phần mềm True Image tạo ghost file tib cũng được vì phần mềm này chuyên nghiệp và có nhiều tùy chọn hơn onekey ghost.
Đợi cho quá trình tạo ghost xong thì có thể tắt máy ảo
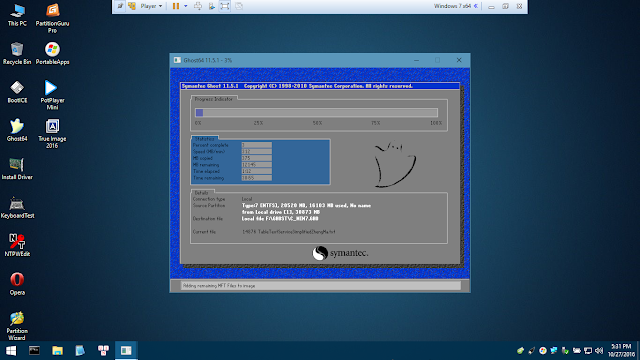
Khi ghost xong bạn copy file ghost vào usb và khởi động lại máy ảo để kiểm tra.
Lời kết
Yêu cầu trước khi thực hành bạn phải đọc thất kỹ tất cả các phần, đọc đi đọc lại đến khi nào hiểu được nội dung mới bắt tay vào thực hành. Có thể trong lần đầu bạn sẽ gắp thất bại nhưng đừng nản mà hãy tiếp tục để cho ra đời những bản ghost theo tâm huyết của chính bạn. Bản ghost muốn chuyên nghiệp nó phải được đúc kết từ tâm huyết, thực hành, kinh nghiệm của bản thân. Chúc các bạn thành công!
Tags:


 6.6 for Windows XP x32/64bit")


 Hướng Dẫn Cài Đặt")

 7.19.508.6 for Win 7/10 x32/64bit")